This tutorial will teach you to make the Student Management System Project step by step. The following system will use to manage the Student Management.
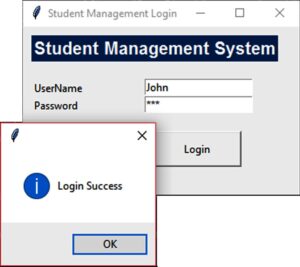
User Login
import mysql.connector
from tkinter import *
from tkinter import messagebox
from subprocess import call

def Ok():
    mysqldb = mysql.connector.connect(host="localhost", user="root", password="", database="studentmanagement")
    mycursor = mysqldb.cursor()
    uname = e1.get()
    password = e2.get()

    sql = "select * from user where uname = %s and password = %s"
    mycursor.execute(sql, [(uname), (password)])
    results = mycursor.fetchall()

    if results:
        root.destroy()
        call(["python", "Mainn.py"])
        return True
    else :
        messagebox.showinfo("","Incorrent Username and Password")
        return False


root = Tk()
root.title("Student Management Login")
root.geometry("300x200")
global e1
global e2

Label(root, text="Student Management System",font=("Arial", 15, "bold"), bg="#00376b", fg="#FFFCF9").place(x=10, y=10)
Label(root, text="UserName").place(x=10, y=60)
Label(root, text="Password").place(x=10, y=80)

e1 = Entry(root)
e1.place(x=140, y=60)

e2 = Entry(root)
e2.place(x=140, y=80)
e2.config(show="*")

Button(root, text="Login", command=Ok ,height = 2, width = 13).place(x=150, y=120)

root.mainloop()
User Main
from tkinter import *
from tkinter import messagebox
from subprocess import call

root = Tk()
root.title("Main")
root.geometry("500x500")
global e1
global e2

def Ok():
    call(["python", "AddStudent.py"])

Label(root, text="Welcome").place(x=10, y=10)
Button(root, text="Add Student", command=Ok, height= 3, width= 12).place(x=10,y=100)


root.mainloop()