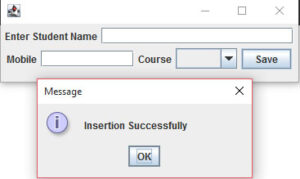
this tutorial will teach how to design complete UI design using java swing application with insert record into the database.

Label Creation
JLabel label1, label2, label3;
Define the name of the Label label1 = new JLabel(“Enter Student Name”);
TextBox Creation
JTextField text1, text2;
Define the textbox sizes text1= new JTextField(21);
ComboBox Creation
JComboBox box1;
Add the items in to the combobox
box1 = new JComboBox(); box1.addItem(“VB.net”); box1.addItem(“Servlets”); box1.addItem(“Java”); box1.addItem(“EJB”);
Button Creation
JButton but1;
Define the name of the button
but1=new JButton(“Save”);
Set the ActionListener
but1.addActionListener(this);
import java.awt.*;
import java.awt.event.*;

import javax.swing.*;
import java.sql.*;

public class Student  extends JFrame implements ActionListener
{
	JLabel label1, label2, label3;
	JTextField text1, text2;
	JComboBox box1;
	JButton but1;

	Connection dbcon1=null;
	PreparedStatement stat1=null;

	public Student( )
	{
	InitDb();
	createForm();
	}
	void createForm()
	{
		label1 = new JLabel("Enter Student Name");
		label2 = new JLabel("Mobile");
		label3 = new JLabel("Course");

		text1= new JTextField(21);
		text2= new JTextField(10);

		box1 = new JComboBox();
		box1.addItem("VB.net");
		box1.addItem("Servlets");
		box1.addItem("Java");
		box1.addItem("EJB");

		but1=new JButton("Save");
		but1.addActionListener(this);

		JPanel panel1=(JPanel)getContentPane();
		panel1.setLayout(new FlowLayout());
		panel1.add(label1);
		panel1.add(text1);
		panel1.add(label2);
		panel1.add(text2);
		panel1.add(label3);
		panel1.add(box1);
		panel1.add(but1);

		setSize(380,110);
		setLocation(150,150);
		setVisible(true);
	}

		void InitDb()
		{
			try
			{
			Class.forName("com.mysql.jdbc.Driver");
			dbcon1=DriverManager.getConnection("jdbc:mysql://localhost/dbcollege","root", "");
			stat1=dbcon1.prepareStatement("insert into records(stname,mobile,course) values(?,?,?)");

		}
		catch(ClassNotFoundException cle)
		{
		   System.out.println("odbc driver error occured");
		}
		catch(SQLException sqe)
		{
		   System.out.println("SQL Exception caught");
		}
		}
	@Override
	public void actionPerformed(ActionEvent e) {
		String Sname=text1.getText();
		String mobil=text2.getText();
		String course=(String)box1.getSelectedItem();
		try{
			stat1.setString(1, Sname);
			stat1.setString(2, mobil);
			stat1.setString(3, course);

			int k=stat1.executeUpdate();

			text1.setText("");
			text2.setText("");
			box1.setSelectedIndex(-1);
			text1.requestFocus();
		if(k==1)
	{
			JOptionPane.showMessageDialog(this,"Insertion Successfully");
	}
		else
		JOptionPane.showMessageDialog(this,"Insertion Failed");

	}catch(SQLException sqe)
	{
		JOptionPane.showMessageDialog(this,sqe.toString());
		}

	}
	public static void main(String[] args)
	{
		Student app1=new Student( );
	}
	}
i have attached the video link below. which will do this tutorials step by step.