In today’s fast-paced business environment, an efficient inventory management system is crucial for success. Companies need a reliable way to track stock levels, manage orders, and reduce costs. With the rise of modern front-end frameworks, React offers an innovative solution for developing powerful inventory management systems.
Why Use React for Your Inventory Management System?
React is a popular JavaScript library known for its versatility and efficiency. One significant advantage of using React for your inventory management system is its component-based architecture. This allows developers to build reusable UI components, enhancing code maintainability. Additionally, React’s virtual DOM feature ensures smooth user experiences by minimizing updates to the actual DOM, which can be particularly beneficial in handling real-time inventory updates.
Install React using following command
npm i vite
import React, { useState } from "react";
const App = () => {
const [price, setPrice] = useState(0);
const [total, setTotal] = useState(0);
const [textAreaContent, setTextAreaContent] = useState("");
const items = [
{ name: "Sugar", value: "Sugar-50.78", price: 50.78 },
{ name: "Rice", value: "Rice-30", price: 30 },
{ name: "Banana", value: "Banana-20", price: 20 },
{ name: "Apple", value: "Apple-40", price: 40 },
{ name: "Tomato", value: "Tomato-10", price: 10 },
];
const handleItemSelect = (selectedItem) => {
setPrice(selectedItem.price);
const newTotal = total + selectedItem.price;
setTotal(newTotal);
// Update textarea content
setTextAreaContent((prevContent) =>
prevContent +
`-----------------------------------\nYour Total is ${newTotal.toFixed(
2
)}\n-----------------------------------\n`
);
};
return (
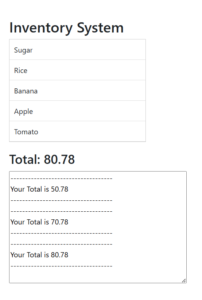
<div style={{ padding: "20px" }}>
<h2>Inventory System</h2>
<ul
style={{
listStyleType: "none",
padding: "0",
border: "1px solid #ccc",
maxWidth: "300px",
}}
>
{items.map((item) => (
<li
key={item.value}
style={{
padding: "10px",
cursor: "pointer",
borderBottom: "1px solid #ddd",
}}
onClick={() => handleItemSelect(item)}
>
{item.name}
</li>
))}
</ul>
<div style={{ marginTop: "20px" }}>
<h3>Total: {total.toFixed(2)}</h3>
<textarea
value={textAreaContent}
readOnly
rows="10"
cols="50"
style={{ marginTop: "10px", display: "block", width: "100%" }}
/>
</div>
</div>
);
};
export default App;
I attached the video below How to make this System