Introduction to Java GUI CRUD
Java is a powerful programming language widely used for building desktop applications. One fundamental aspect of many applications is the ability to manage data through Create, Read, Update, and Delete (CRUD) operations. In this tutorial, we will walk through creating a simple Java GUI application that performs basic CRUD operations, making it suitable for beginners.

First Step import the Sql namespace at the top : import java.sql.*;
After that implement the sql class
Connection con;
PreparedStatement pst;
ResultSet rs;
DefaultTableModel df;
After that use the connect method connet the databases
public void connect()
   {

       try {
           //Register the driver
           Class.forName("com.mysql.cj.jdbc.Driver");
            con = DriverManager.getConnection("jdbc:mysql:/phonebook","root","");
            System.out.println("Connected");
       } catch (ClassNotFoundException ex) {
           Logger.getLogger(Phone.class.getName()).log(Level.SEVERE, null, ex);
       } catch (SQLException ex) {
           Logger.getLogger(Phone.class.getName()).log(Level.SEVERE, null, ex);
       }
   }
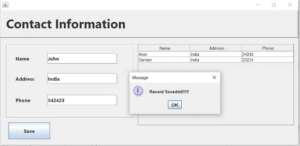
Paste the code into the Save Button
String name,address;
int phone;

name = txtName.getText();
address = txtAddress.getText();
phone = Integer.parseInt(txtPhone.getText());


try {
    //query
    pst = con.prepareStatement("insert into contact(name,address,phone) values(?,?,?)");
     pst.setString(1, name);
     pst.setString(2, address);
     pst.setInt(3, phone);
     pst.executeUpdate();
     JOptionPane.showMessageDialog(null, "Record Saveddd!!!!!!");
     Phonetable();

} catch (SQLException ex) {
    Logger.getLogger(Phone.class.getName()).log(Level.SEVERE, null, ex);
}
Load the Table
public void Phonetable()
   {
       try {
           pst = con.prepareStatement("SELECT * FROM contact");
           rs = pst.executeQuery();

           //pass into the respective table
           df = (DefaultTableModel) tblbook.getModel();
           df.setRowCount(0);

            //contribute the table columns
            while (rs.next()) {
           df.addRow(new Object[]{

               rs.getString("name"),
               rs.getString("address"),
               rs.getInt("phone")
           });
       }
       } catch (SQLException ex) {
           Logger.getLogger(Phone.class.getName()).log(Level.SEVERE, null, ex);
       }

   }
I attached the video below How to make this System