In this lesson we talk about laravel 12 image uploading and display the image step by step.Laravel is world famous php framework.it has various features.Laravel is a MVC architecture. In this tutorial will see how to make a Image Uploading and Display the image in Laravel 12. Here is the Best Place to Learn Laravel 11.laravel tutorial source code
Install Laravel 12
Create a new Project type the command on the command prompt . I create the project name image-example
Laravel 12 Tutorial Setup the Project
composer create-project laravel/laravel img-app
Database setup
Create the Database on xampp which name is dboffice
After created the database.you have to give the and databasename and user creditinels on laravel .env file.
Create Migration and Create Model
php artisan make:model Product -m
Click and open the Migration file
inside the function up() function i shown in below clearly.
public function up(): void
  {
      Schema::create('products', function (Blueprint $table) {
          $table->id();

          $table->string('productname');
          $table->string('description');
          $table->double('price');
          $table->string('photo', 300)->nullable();
          $table->timestamps();
      });
  }
After add the lines type
php artisan migrate
After Model is Created the look like this. Code inside Model Class (app\Models\)
class Product extends Model
{
    protected $table = 'products';
    protected $primaryKey = 'id';
     protected $fillable = [
          'productname',
          'description',
          'price',
          'photo'
      ];

    use HasFactory;
}
Create Controller
Create the controller name which is ProductController
php artisan make:controller productController --resource
inside the controller you have do the following code snippet
<?php

namespace App\Http\Controllers;

use Illuminate\Http\Request;
use App\Models\Product;

class productController extends Controller
{

    protected $products;

    public function __construct()
    {
        $this->products = new Product();
    }


    public function index()
    {
        $products = $this->products->all();
        return view('product.index', compact('products'));

    }


    public function create()
    {
        //
    }


    public function store(Request $request)
    {
        $validatedData = $request->validate([
            'productname' => 'required',

            'description' => 'required',
            'price' => 'required',
            'photo' => 'image|mimes:jpeg,png,jpg,gif|max:2048', // Adjust file size and allowed extensions as needed
        ]);
        // Check if the file was uploaded successfully

        // Check if the file was uploaded successfully
        if ($request->hasFile('photo')) {
            // Store the photo in the public/images directory
            $fileName = $request->file('photo')->store('images', 'public');
            // Add the photo file name to the validated data
            $validatedData['photo'] = $fileName;
        }

        Product::create($validatedData);
        return redirect()->back();
    }

}
Create Views
Create a Folder inside the resources-views
inside the views folder create the product folder
In Laravel you have create the pages using layout.blade.php
layout.blade.php
<!DOCTYPE html>
<html lang="en">
<head>
    <meta charset="UTF-8">
    <meta name="viewport" content="width=device-width, initial-scale=1.0">
    <title>Document</title>

<link href="https://cdn.jsdelivr.net/npm/bootstrap@5.3.3/dist/css/bootstrap.min.css" rel="stylesheet" integrity="sha384-QWTKZyjpPEjISv5WaRU9OFeRpok6YctnYmDr5pNlyT2bRjXh0JMhjY6hW+ALEwIH" crossorigin="anonymous">
</head>
<body>

                        @yield('content')

</body>
</html>
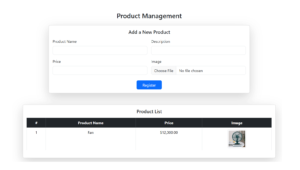
create a folder product inside the folder create a file
index.blade.php
@extends('layout')

@section('content')
<div class="container mt-5">
    <h3 class="text-center mb-4">Product Management</h3>

    <div class="row justify-content-center">
        <div class="col-md-8">
            <div class="card shadow-lg">
                <div class="card-body">
                    <h5 class="card-title text-center mb-3">Add a New Product</h5>

                    <form method="POST" action="{{ route('product.store') }}" enctype="multipart/form-data">
                        @csrf
                        <div class="row g-3">
                            <div class="col-md-6">
                                <label class="form-label">Product Name</label>
                                <input type="text" class="form-control rounded-3" name="productname" required>
                            </div>

                            <div class="col-md-6">
                                <label class="form-label">Description</label>
                                <input type="text" class="form-control rounded-3" name="description">
                            </div>

                            <div class="col-md-6">
                                <label class="form-label">Price</label>
                                <input type="text" class="form-control rounded-3" name="price" required>
                            </div>

                            <div class="col-md-6">
                                <label class="form-label">Image</label>
                                <input class="form-control rounded-3" name="photo" type="file" id="photo">
                            </div>
                        </div>

                        <div class="text-center mt-4">
                            <button type="submit" class="btn btn-primary px-4">Register</button>
                        </div>
                    </form>
                </div>
            </div>
        </div>
    </div>

    <!-- Product Table -->
    <div class="row mt-5">
        <div class="col-md-10 offset-md-1">
            <div class="card shadow-lg">
                <div class="card-body">
                    <h5 class="card-title text-center">Product List</h5>

                    <table class="table table-bordered table-hover text-center mt-3">
                        <thead class="table-dark">
                            <tr>
                                <th>#</th>
                                <th>Product Name</th>
                                <th>Price</th>
                                <th>Image</th>
                            </tr>
                        </thead>
                        <tbody>
                            @foreach ($products as $key => $product)
                            <tr>
                                <td>{{ ++$key }}</td>
                                <td>{{ $product->productname }}</td>
                                <td>${{ number_format($product->price, 2) }}</td>
                                <td>
                                    <img src="{{ $product->photo ? asset('storage/' . $product->photo) : asset('images/default.jpg') }}"
                                         alt="Product Image" class="img-thumbnail" width="80">
                                </td>
                            </tr>
                            @endforeach
                        </tbody>
                    </table>

                    @if($products->isEmpty())
                        <p class="text-center text-muted mt-3">No products found.</p>
                    @endif
                </div>
            </div>
        </div>
    </div>
</div>
@endsection
Routes
Pages are Manage through routes. If you are crud system simple you can add it the routes one line look like this
<?php

use Illuminate\Support\Facades\Route;
use App\Http\Controllers\ProductController;

Route::get('/', function () {
    return view('welcome');
});
Route::resource('/product', ProductController::class);
Storage Folder
After that we need Store images inside the Storage Folder have to link them
php artisan storage:link