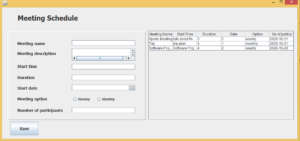
This tutorial will teach you how to make a Meeting schedule system Project Java and Mysql.this system easy to store the records into the database.

Feature of projects
The system shall be able to record meeting details
The system shall be able to retrieve the meeting details
Learn how to make this System Step by step
Step 1: Download JDK Click here follow the steps and install it.
Step 2: Download an appropriate jdbc driver Click here in order to connect jdbc and mysql.
Step 3: Download xampp server Click here follow the steps and install it.
after installed xampp server in your computer. you shall be able to create datebase.i explained clearly in the video tutorials i gave the link below.
Establish the database connection
  public void Connect()
    {
        try {
            Class.forName("com.mysql.jdbc.Driver");
            con = DriverManager.getConnection("jdbc:mysql://localhost/keels","root","");
        } catch (ClassNotFoundException ex) {

        } catch (SQLException ex) {

        }
    }
paste the code inside the Save button
        String mname = txtmname.getText();
        String mdes = txtmdes.getText();
        String mtime = txtstime.getText();
        String duration = txtdur.getText();


       SimpleDateFormat date_format = new SimpleDateFormat("yyyy-MM-dd");
       String startd = date_format.format(txtdate.getDate());


       if(rdbweekly.isSelected())
         options="weekly";
       else if(rdbmonthly.isSelected())
         options="monthly";

       String patci = txtpno.getText();

        try {
            pst = con.prepareStatement("insert into meeting(meetingname,description,starttime,duration,startdate,meetingoption,participants)values(?,?,?,?,?,?,?)");
            pst.setString(1, mname);
            pst.setString(2, mdes);
            pst.setString(3, mtime);
            pst.setString(4, duration);
            pst.setString(5, options);
            pst.setString(6, startd);
            pst.setString(7, patci);


            int status = pst.executeUpdate();

            if(status==1)
            {
                JOptionPane.showMessageDialog(this, "Meeting Addedddddd");
                MeetingTable();

            }
            else
            {
                JOptionPane.showMessageDialog(this, "Meeting Failedddd!!!");
            }

        } catch (SQLException ex) {
            Logger.getLogger(Meeting.class.getName()).log(Level.SEVERE, null, ex);
        }
View Records
Create the function MeetingTable and write the following code inside the function to load the jtable.
  public void MeetingTable()
    {
        try {
            pst = con.prepareStatement("select * from meeting");
             ResultSet rs = pst.executeQuery();
             ResultSetMetaData RSM = rs.getMetaData();
             int c;
             c = RSM.getColumnCount();
             DefaultTableModel DF = (DefaultTableModel)jTable1.getModel();
             DF.setRowCount(0);

             while(rs.next())
             {
                 Vector v2 = new Vector();
             for(int i = 1; i<=c; i++)
             {
                  v2.add(rs.getString("meetingname"));
                  v2.add(rs.getString("description"));
                  v2.add(rs.getString("starttime"));
                  v2.add(rs.getString("duration"));
                  v2.add(rs.getString("startdate"));
                  v2.add(rs.getString("meetingoption"));
                  v2.add(rs.getString("participants"));
             }
             DF.addRow(v2);
             }

        } catch (SQLException ex) {

        }
    }
i have attached the video link below. which will do this tutorials step by step.