Up next in 10

Brevo Email Marketing Full Course Templete Creation | Free Email Marketing Tools | Part 2
Brevo Email Marketing Full Course | Free Email Marketing Tools for Beginners
https://youtu.be/H2FG4v0h1N8
#emailmarketingfullcourse #brevoemailmarketing #emailmarketingbravo
#emailmarketingplatforms #emailmarketingfreetools
Show More Show Less View Video Transcript
0:00
Hi friends, welcome to tutors channel.
0:02
In our last class, we discussed about
0:04
the preo which is a email marketing
0:06
tool. We already uh I have uh shown how
0:11
to create the account on preo uh and
0:14
everything. So in this class I'm going
0:16
to teach the how to
0:20
create the template. So go to the
0:22
marketing.
0:25
Okay, marketing. So here so here you
0:28
have to select as a template
0:33
the template I'm going to start with the
0:34
template. So the template I haven't
0:37
created in my last class. Okay just I
0:40
show you how to create
0:44
designs. Okay. So here you can see here
0:46
they create click on
0:57
okay now you are coming on this point.
1:00
Okay this point what you're going over
1:02
is here it asking the template name and
1:06
subject line. So that is very important
1:07
stuff. Let's take the example of the
1:09
document. So this is the email uh
1:13
content we have created from our content
1:15
writers. So here you can see the these
1:18
are the emails. So who register on that
1:20
particular seminar webinar we have to
1:23
that name you have getting here the uh
1:27
okay we are getting the name uh here uh
1:31
the name. Okay so this email subject you
1:34
have to specify the subject over here.
1:36
This is subject copy this and paste on
1:39
it. This one should be more attractive.
1:41
Give us about it. It expert guidance
1:44
live free for our friendly Twitter. So
1:47
this is a very
1:49
best text. Okay. So you have to get the
1:51
text like this. Okay. So now after that
1:55
what we going to do is we have to get
1:56
the uh this adder. Add mean Java place
2:00
on the Java
2:03
core Java webinar. Okay. So here they
2:05
curious about that what what is the
2:07
meaning of this is adding of the
2:10
template. So this one should be sublime.
2:13
This is the things we are curious about
2:15
the clickable. Okay. When the when the
2:19
person come to read their emails first
2:21
go to the let's check that uh email
2:24
title along with the subject line. Okay.
2:28
So that's that's the things we have to
2:30
do here. After that go to the design.
2:33
Here we are. There are many designs are
2:35
there. Go along with the custom as well.
2:38
So here you can go to
2:41
here there are layouts there template
2:43
gallery. If you are going to launch any
2:45
new products ecommerce website like this
2:49
you can go along with this template as
2:54
you can see here there are many
2:55
templates are there.
3:00
My template
3:05
code. Okay, there are many templates
3:07
there. You have here also you can uh
3:09
design the code and you have to
3:10
implement here.
3:13
Okay, now I have to get it done by
3:17
choose one of these. Okay, so I'm going
3:20
to
3:22
uh get this layout.
3:25
Okay, the layout I'm going to go to the
3:27
from the scratch. Start from the scratch
3:29
mean
3:30
starting that webinar from the scratch.
3:36
Okay. Simply we have to create the
3:38
webinar.
3:45
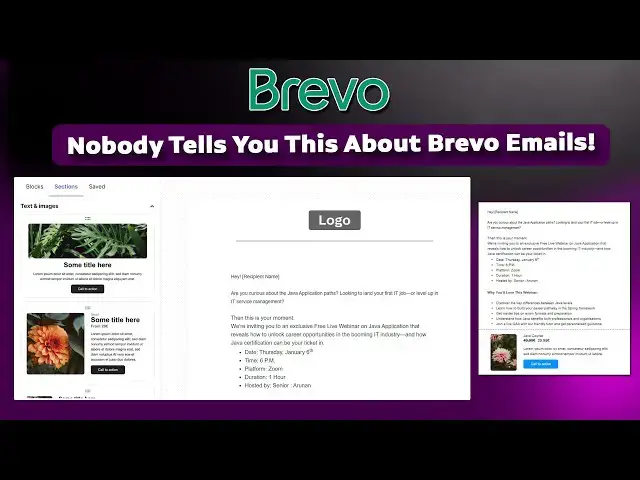
It's coming here like this. Okay. So
3:47
content everything is a text. You can
3:49
write the text and everything here. You
3:50
can create the text. So you can the text
3:53
you can you can adjust this one
3:56
drag in and everything
4:00
drop it
4:03
you have select the text you have to
4:04
select as 14 it should be the is fine
4:08
you can adjust the size which you want
4:10
okay just look like this way you can do
4:12
it okay after that I need this one
4:16
I just copy this
4:19
paste on it here.
4:24
Okay, this how we have do the template
4:26
design. You can say this how the
4:27
template will be go to your email. Okay,
4:30
when you promote this one, you can go to
4:32
email. You type this way
4:35
this one. What happen this
4:39
cut off this can go below this one.
4:44
Perfect. Okay, now what I'm going to do
4:46
is Okay, the all things are fine.
4:50
Now what I'm going to do is I want to go
4:52
to the next one. Uh
4:57
here if you don't need the image you can
4:59
select here below you can create the
5:01
image. Whatever image you can we have it
5:04
uh regarding the webinar you can insert
5:06
the image. Okay. So if you want to
5:10
insert the logo you can get the logo.
5:12
Okay. Everything are there. Okay. If you
5:14
want to implement the HTML code HTML
5:17
code is there. So here you can uh here
5:20
you can see there this everything you
5:21
can second one I'm going to copy this
5:23
one and this one I don't have any image
5:26
I'm going to not implement it so I'm
5:28
going to delete them here like this I
5:29
want to drag it the text again here this
5:33
moment I'm going to paste it on this one
5:36
you have to highlight it correctly okay
5:40
so that's how we have to do it okay this
5:43
extra base you have to backspace to
5:45
remove the extra base it take of it.
5:48
Okay, this we have do the things. Okay.
5:50
So here you have a section wise if you
5:53
have implemented the different section
5:55
you can see check it check on it.
5:57
There's a templates are there.
6:01
Okay. If you have any promotion this are
6:03
going on. You just drag and drop it
6:04
below.
6:06
You can implement the images over here.
6:08
You have to display here the anything
6:11
else. Okay. This uh this is a course
6:13
Java course
6:16
something like that. Okay. This is just
6:19
a webinar. So I'm going to uh promote
6:22
any Java without any courses. You have
6:24
to implement the the respective images
6:26
over here. Here you have to add the
6:29
respective prices
6:32
uh respective prices based on the course
6:36
the code where you are going to selling
6:38
what is the uh price of that course you
6:41
can you can easily write off here. Okay.
6:44
It's very simple. You have to add the
6:46
price as well when you implement the
6:48
courses courses. Okay. So there are lot
6:50
of choices. Okay. You can get them uh
6:53
the section
6:55
here. There are three column section
6:57
also. This one also you can drag it. If
7:00
you are going to moving to your email
7:02
what is the you are selling some
7:04
products to the customer. These are the
7:06
products also. You can you can choose
7:08
the image. So click on it here.
7:13
Here we are. You can just imagine this
7:16
is this this is your product image. You
7:17
click on it.
7:20
Okay. Click on it. It is insert.
7:23
It is insert here. It will be there.
7:26
Okay. This how you have to insert the
7:27
images. Okay. So this here also the same
7:30
thing you can insert the image. Okay. So
7:33
this how we can add the prices of the
7:36
products. This how you can do it. Simple
7:39
very simple. This how you can do the
7:41
things well
7:43
this very simple so you have to do the
7:46
things what I'm showing here okay very
7:49
simple this how we have implement the
7:50
email template okay this everything
7:53
there you can get it from the template
7:55
design you can see this one should be
7:59
uh everything there logo and everything
8:01
are there this is a footer part the
8:03
footer the finally we need a footer of
8:05
the part okay so you have to drag the
8:07
footer put it over here the footer I
8:09
also here the company name here the
8:12
social media if you want you have to
8:13
select this one and you can give the
8:15
Facebook Insta LinkedIn all the links of
8:19
your company here okay your all the
8:23
links based on your social media okay
8:27
social media related on the social media
8:30
you can use here okay all the things you
8:33
can do it unsubscribe this must okay
8:35
what what we are going to what is the uh
8:38
purpose of your automatically the
8:40
unscribed uh link will be showing here
8:42
is when you are sending the email
8:44
unscribed you you must implement the uns
8:47
unsubscribe link okay so that is must
8:52
okay that is the purpose okay so here we
8:54
have we don't have a editing and
8:56
everything here you can see here
8:59
uh here you can go to the section
9:03
uh you can see some of the template
9:09
here The promotion if you if you are
9:11
willing to do the promotion you can drag
9:13
it and drop your promo all things you
9:15
have to implement it over here. Here
9:17
this one you can logo and do all your
9:19
company log you can add this is this is
9:22
the data section here this are the add
9:23
section the data section also
9:25
implemented above here it's coming here
9:28
okay you can implemented your logo of
9:29
the company over here under the logo you
9:32
can implement it like this okay so here
9:35
there different different uh uh sections
9:39
are there you can get okay here this
9:41
simply here this is some footer section
9:44
like this here empty column paste it.
9:47
There's a lot of things available. You
9:50
can drag and drop it and you can do the
9:51
email email templates. Well, here you
9:54
can if you want to change the text, you
9:56
will be able to change it. Whatever you
9:57
can edit. Okay? You can bold the text,
10:00
send everything, you can do it by here.
10:02
Increase the uh letter size and
10:04
everything. Okay? You have to bold it,
10:06
click on it. If you want to bold
10:08
everything, you can do it over here.
10:10
Very simple. Okay? Control B. Control B.
10:13
It can bolt. Okay? It's already bold. If
10:16
you need a bold you just like your word
10:18
Excel, PowerPoint like a MS collection
10:21
but the shortcut key you are using the
10:23
same shortcut key you that same shortcut
10:27
key also they are implemented over here
10:30
because this all the documents are based
10:32
on the word type. So the words what are
10:34
the shortcut keys are using on the
10:36
office package the same shortcut key you
10:38
will be able to use this document as
10:40
well. Okay, the same thing you have to
10:44
implement it over here so that you don't
10:46
bother about all the all the things
10:47
shortcut keys and all you can whatever
10:49
shortcut key I used on that word
10:51
document and all the same uh shortcut
10:54
key you are implemented over here that's
10:55
the thing okay this is a
11:00
nicely we can done the email template
11:02
like this okay this over here this is
11:04
this is just sample I have done it you
11:07
can do it uh the here go around with
11:10
this blocks
11:11
Videos also you can implement it.
11:13
Everything are there section and save.
11:16
Okay. All the things all the after the
11:18
after done the stuff you have to quit
11:20
save and quit.
11:27
That's it.
11:30
That's when you have Okay. Save and
11:36
you can save and create. This is your
11:39
email address. Okay. So this how we have
11:41
made the email email template design.
11:44
This email template design you can use
11:46
it over here marketing uh campaign run.
11:50
The how to run the campaign we can see
11:51
in my next video tutorial. Thank you for
11:53
watching.