Up next in 10

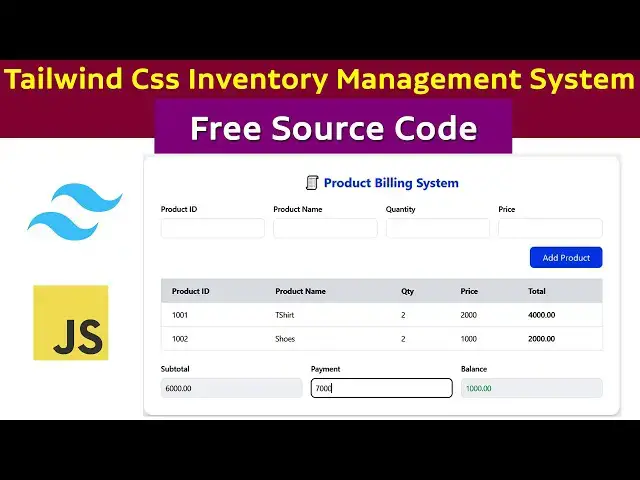
In this full-length tutorial you’ll learn how to build a complete inventory management system using Tailwind CSS and JavaScript – including front-end layout, form validation, and sales calculation.
This video is perfect for anyone who wants to understand inventory management, set up a lightweight POS system, or follow a Tailwind CSS tutorial with real source code. We focus only on the front end and JavaScript part (no backend) so you can easily follow along and get your own system running quickly.
📥 Free source code included — download and customise your own version of the inventory/cash-register style system.
🔍 What you’ll learn in this video:
Building the UI for an inventory management system with Tailwind CSS
Applying a clean, responsive layout using utility classes
Implementing JavaScript form validation (required fields, numbers only)
Adding sales calculation logic (quantity × price, running totals)
#tutusfunny,#tutusfunnyyoutubechannel #inventorymanagementsystem
#inventorymanagement #possystem #tailwindcsstutorial
#csstutorial #tailwindcss
Show More Show Less View Video Transcript
0:00
Okay. Now I'm going to explain how to
0:03
move this sales system step by step. So
0:06
it's very simple. So I'm going to go to
0:09
my G drive
0:14
pos.
0:17
I'm going to name Tailwind.
0:22
I just name it as this one. Here I'm
0:25
going to make cmd
0:28
code space dot.
0:31
Now I'm going to
0:36
create the file index html.
0:39
Here I'm going to implement the HTML
0:41
CSS. So hold on the shift key down and
0:43
press one.
0:45
Click and implement that. After that I
0:47
want to include the
0:50
HTML tag. HTML
0:53
uh
0:56
uh CSS stylesheet. So how to implement
0:58
the uh stylesheet? Go to
1:02
tailwind CSS official websites.
1:16
[Music]
1:18
Here
1:21
I'm going to go to the past CDN.
1:30
Select this one.
1:33
Paste it in inside here. That's it.
1:35
That's how we have attached it. After
1:37
that, what I'm going to do is
1:42
I'm going to go to back to my code.
1:47
It's a body type body how to implement
1:51
the flags. Okay. So
1:54
you can just check that it is
1:57
horizontally center vertically center.
2:00
So we simply implemented here flags. How
2:04
to implement it in here? You have to
2:06
write the div starting div closing div.
2:08
Okay. Here here also we have write the
2:12
body flags. You have to implement the
2:14
flags. Flags.
2:16
How to implement the flags in VS code
2:19
editor? Yeah. Uh this one flags we have
2:23
to implement it like this. Item center
2:25
justify. This how we have implement the
2:28
flags in
2:30
VS code editor. Sorry CSS item center
2:38
here. Write here class. That's why the
2:39
problem is happening.
2:41
Flax item center
2:45
justify content center.
2:49
Okay. So this how we have to implement
2:50
the flexbox.
2:55
So it will be coming this body
3:01
horizontally center vertically center.
3:02
So we have to implement this one. Okay.
3:04
This are very simple.
3:08
Okay. Item center justifying content.
3:11
You must understand these things. After
3:13
that what I'm going to say next thing I
3:15
have explained
3:17
DG gray 100 minimum edge skin this one
3:21
because this
3:26
gray outer gray the body gray.
3:31
Okay. So that the body color should be
3:33
this.
3:36
Now let's run and check it what
3:38
happened.
3:44
here
3:46
gray.
3:48
It should be gray.
3:54
After that I have to put another div.
3:56
This div we have to this div I just copy
3:59
and paste it. I'll be
4:02
this is the div we have created the
4:07
this box. How to do the ring as
4:12
full it nothing but w with full mean it
4:17
zero it uh like this way with
4:22
100 pixel it's nothing but w with 100
4:24
pixel we have to uh simply in tailwind
4:28
we have called as this one okay this
4:30
maximum width for excel mean so you have
4:33
to go to the uh documentation of
4:36
tailwind you can understand that it is
4:39
like this max width
4:42
maximum width.
4:45
Okay.
4:47
Even though you have a 100%age width but
4:50
we have a maximum width. We have a
4:54
this is a maximum width
4:56
we have write it.
5:01
Okay. 4 X BG color BG white BG white
5:06
mean it is a BG white color of the box
5:09
is a padding you have set set as eight
5:12
if you set as two observe what happen
5:17
okay so here
5:19
okay so sorry it's not okay it's not
5:22
okay eight so
5:25
rounded to excel mean this is a rounded
5:31
Roundest corner we have called as
5:33
rounder to excel. Shadow LG means a
5:36
shadow. Here there are shadow around the
5:40
corners around the box we have a corner
5:43
uh corn on a point there around the
5:45
corner we have shadow that's called as
5:47
shadow. That's it.
5:50
So here you have understand this is the
5:52
text to excel mean they have to make the
5:56
text large. So if it is 4 XL mean you
5:58
can see
6:02
sorry not this here I have shown here
6:05
that's why it's not working
6:10
uh where's that point it's working
6:21
here
6:23
understand what happened okay so it is a
6:26
largest size. So here what you're going
6:28
to here two is enough for me. Okay. So
6:32
the font font is a margin bottom we have
6:36
write this as a six. Okay. Text center
6:39
and uh color group. So here now you can
6:42
adjust and check it.
6:44
P2. So what happen? So everything you
6:46
can adjust and check it
6:49
clear. Now it's working.
6:53
Okay. What happened here? It is simple.
6:55
6 it is padding 8 is good margin we have
6:59
to arrange at four what happen little
7:01
bit it will be arranging okay here it is
7:05
a six is enough margin mean it's it's
7:08
little it's okay simple okay
7:12
okay so this we are going with this one
7:14
okay so now what I'm going to do is
7:15
after that I want this adding I have did
7:18
it successfully now I'm going to go go
7:20
along with that this section
7:23
create open and section
7:26
This grid we have to make it as grid
7:28
column. Grid column we have made as
7:32
four. Gap in between the gaps we have
7:35
for this a margin bottom form. This is
7:38
the thing we have to it. Now here
7:40
implement the press forms simple form.
7:44
Okay. This a form you have write it
7:45
here. What is the form? What are the
7:46
forms? This is a form label. This is the
7:51
input box. Okay. Okay, this input full
7:54
with full class and uh uh we have to
7:57
style it something. This is all the CSS
7:59
style you have. Okay, the CSS style.
8:01
Okay, that's uh you can go to the uh
8:04
documentation of Tailwind here. You can
8:07
have it the text box and everything.
8:09
Okay, you can get pick up this one here.
8:11
The text decoration text everything are
8:14
there text box. You can go to the text
8:15
box and you can find it. Those text box
8:17
I get from there. So yeah, that's one
8:20
thing I just copy. Simple
8:27
implemented over here. Pretty simple.
8:30
Now let's check them how the process
8:32
work.
8:34
Okay, it's
8:37
okay. The answer four
8:40
is four columns. You have to make it as
8:43
four columns. The five columns mean it
8:47
has arrangement another columns five
8:50
this is the meaning okay
8:54
this five columns okay this is meaning
8:56
of grid grid I how many columns we need
8:59
so this is two three mean uh uh three
9:03
mean three uh four mean four is coming
9:05
if it's two mean it's like that two it's
9:08
coming like this okay based on that you
9:11
have to identify okay so that is the
9:12
thing you have to read very simple
9:16
Okay. Four. So gap in between the gap.
9:19
How many gaps we need? It's a margin
9:21
bottom. If it is not get rid of this,
9:23
what happen? Margin bottom. What happen?
9:25
Everything you have to put and check
9:26
here. You need a gap. We need a margin.
9:31
Okay. It's a margin.
9:34
Margin. Margin mean this is and this
9:36
portion we need a margin. After that we
9:39
have another one. Uh everything are
9:41
successfully. Now let's back to another
9:43
code.
9:45
Uh this button
9:48
we have a button add button. So add
9:51
button. We need another another code
9:52
which is add button. We copy this.
9:58
Okay. This code a form code. It's a form
10:01
starting
10:03
uh where the form is starting. This is a
10:04
gap. Okay. Gap is starting is a form
10:07
starting. It's a closing here. We have
10:09
put it here. This one. Check on it. Chat
10:13
product
10:16
say add product.
10:19
Okay. Add product. Okay. Okay. So below
10:22
we have the second line we have to add
10:24
product. Add product. What I did here is
10:27
here justify content. End mean it's
10:30
coming here. Add mean justify content
10:32
admin here. Margin file. You have to in
10:35
between this one you have to a margin
10:37
file. Okay. It's a simple button. We
10:39
have it this button.
10:41
uh rounders corner and everything we
10:43
have set it in this button.
10:46
Okay, this button we have set the only
10:48
click method add. If you when you click
10:50
this button we have to add the products.
10:53
That's a simple stuff you have to do it.
10:56
Okay, after that what I did here is rest
10:59
of the code. Let me look at the rest of
11:01
code.
11:03
We have to implement the table.
11:07
Okay. So the table implementation we
11:10
have to implement the overflow. Overflow
11:12
mean we have to scroll. Scroll means we
11:14
have to add that the products we have to
11:16
table we we have to scroll scroll we
11:19
will be able scroll. Scroll mean you
11:21
have to scroll that table. So we have to
11:23
add the products here something product
11:26
quantity price here we add again again
11:30
by we will be able to scroll
11:32
we'll be able to scroll scroll. So that
11:34
we have to add that uh implementation
11:37
overflow after table width also we have
11:39
to make it as full mean uh 100% text sm
11:45
uh small. So here we have to write uh uh
11:48
text left border uh border gray. Okay,
11:51
border we have to make it as gray that
11:53
this all things. Okay, all the gray this
11:56
all thing we have to arrangement of this
11:57
CSS styles border clock. Okay, this all
11:59
things are border related stuff. After
12:02
that we have a gray bg gray. Gray means
12:05
a gray color. This is a gray color. It's
12:07
called as a gray color product. Okay,
12:10
that's that's the thing we have to
12:11
implemented this thing. Okay, so you
12:13
have to this implement this a uh heading
12:17
this is a table. So this some just
12:18
copied
12:24
past it over here.
12:26
Now let's refresh them.
12:30
Let's go here. What happened?
12:33
Okay, no problem. This is the problem is
12:36
your hooked here inside here not
12:38
outside. That's why it's went. It's
12:40
okay. Now it's fine. Okay, now it's
12:43
working fine cuz everything went well.
12:46
So now after that what I'm going to do
12:48
is here's a T body here where once you
12:53
enter the item click add button the item
12:56
should be added here this ID inside the
12:59
T body the respective product ID product
13:02
name and product uh uh quantity price
13:05
and total according to the all the
13:07
product information added inside the T
13:09
body that's it after that what I'm going
13:12
to do is after done the stuff we have to
13:15
go again
13:18
uh
13:19
we have to do there this one.
13:23
Third one is a one will be this one
13:27
that grading this one. Third one should
13:31
sorry not here
13:34
this what is here third one should be
13:36
there
13:38
uh third line third line what I mention
13:40
is grid grid column this one we have to
13:44
grid column three we need gap in between
13:46
the gap we have to assign as four we
13:48
have as a label three labels we have to
13:50
assign subtotal payment and balance here
13:52
also we have to make the calculation
13:54
part as well uh we have a payment
13:57
calculation we have a this
14:01
Okay, the payment calculation we don't
14:02
need this one here one payment
14:04
calculation we accidentally we don't
14:06
need them we have a three text boxes
14:09
okay so after that what you're going to
14:11
so sorry sorry not not here this on on
14:15
input mean uh there is a method which is
14:18
a when you enter the payment it
14:21
automatically this this this calculated
14:23
balance function will be take care of
14:25
the balance it automatically take care
14:27
of the balance that is the
14:29
uh this function does okay now just
14:32
everything are done as we as we casted
14:38
our expectation way we already done we
14:42
what we expect all things are done what
14:45
we expect now I need to do the
14:48
calculation part calculation part which
14:51
we get it done by the JavaScript
14:54
okay so that like let's implement the
14:57
JavaScript implementation let's
14:58
implement ment JavaScript implementation
15:00
as well. So this is JavaScript
15:02
implementation. First I'm going to start
15:06
with the script close script. Okay.
15:09
Don't implemented outside the body.
15:12
There are many people are doesn't know
15:15
they are implemented outside the body.
15:18
That is completely wrong. You have to
15:19
implement inside the body. That is the
15:21
efficient way to implement the
15:22
JavaScript.
15:24
You have to create the variable
15:26
uh subtotal. Here you have to type the
15:30
function add product. This product we
15:32
have a we have these are the text boxes.
15:37
Product id,
15:40
product name, quantity. These are the
15:42
ids. This ids what are the text you are
15:44
written over here
15:46
but implemented product ID product name.
15:49
Click add button. So what happen is here
15:55
this all the value should be assigned to
15:57
this relevant variable. This all the we
16:00
have make create the variables you have
16:01
to con type ID first name and quantity
16:04
price. This all the document get element
16:07
ID. We have get the ID and set to this
16:09
variable. Get the ID set into this
16:10
variable. Get the ID and set it to the
16:13
respective variable. Get the ID set into
16:15
the respective variable. This is the id
16:19
that we are identify by this text box
16:22
via uh by the ID. We are identified by
16:24
the text box that particular text box we
16:27
identify by the ID. This text box we
16:30
identify by the ID which is a product
16:32
name. This text box identify the ID
16:34
which by the quantity all things we have
16:36
set into correct correct correctly or
16:38
set it. After that we have to uh check
16:41
on that all the fields are empty or not.
16:43
Okay. If it is empty we have to throw
16:44
the array. Please fill the fields. If it
16:46
is not empty, we have to go over here.
16:49
We have to after that what happen is we
16:51
have to calculate the total. So the uh
16:53
quantity and price check with the
16:55
quantity. Now like here product ID,
16:59
product name, quantity, price. Click add
17:02
button here.
17:05
The B what is the quantity and prices
17:07
added.
17:09
So what is the quantity you have
17:10
selected and price also? What is the
17:13
price? You are given the calculate the
17:15
total has been calculated according to
17:18
the uh quantity multiply with price.
17:23
That's how it uh things work on it. So
17:26
here so here what you're going to see
17:29
here we have to it's not this we have to
17:34
so here we have a multiply. So here
17:37
simply this is a quantity uh text field
17:42
uh price text field. So what is the
17:43
value we assign here? This both variable
17:45
we have put it over here. We can't
17:48
directly we have to multiply. We have to
17:50
cast it. Cast we have convert it.
17:52
Convert mean we have using the number.
17:55
So using the number we will be
17:56
calculated and assigned to the total
17:58
variable.
18:00
How total is added? Fine. After that the
18:02
total must be added into the table.
18:04
Table how to create the tables we have
18:07
to add it here. Simple code I have
18:09
written here. Simple code everyone can
18:11
understand.
18:13
This is a table ID.
18:16
So this table ID here this a table ID.
18:19
Inside the T body we have created the
18:21
table. This table ID we used to once you
18:25
add the products it is added inside the
18:27
table body. This is a table body. T
18:30
body. It is meaning of T body. This T
18:32
body. This is the table ID. Table
18:36
product. Okay. This product we have to
18:38
assign to this variable. After that row,
18:41
it is starting with TR. Create TR mean
18:44
create row. Okay. So, row class list add
18:48
we have a simple style we have to add
18:50
here. Here write row inner HTML. We have
18:53
to added this all the variables things
18:55
ID, product name, quantity, price and
18:57
total. What is the item here? Uh here we
19:02
have written here product ID, product
19:05
name, quantity and price. Click add
19:06
button. These all the items should be
19:08
added to the below table. So once you
19:10
click add button these items should be
19:12
added to the below table
19:14
at the same time total has been
19:16
calculated. This will be calculated.
19:19
What's the meaning of two fix mean? It
19:21
is nothing but these two points. It's
19:24
just nothing but the two point.
19:27
Okay. The decimal points called as that
19:30
fix. Okay. After that table append child
19:34
row mean this row we are call it here.
19:36
This row should be added here. So append
19:40
the simple stuff like
19:44
how is that we have to do the subtotal
19:46
part. Subtotal mean this is subtotal.
19:49
How to make subtotal? We have to create
19:52
the variable which is a subtotal. This
19:54
is a length first one zero subtotal. You
19:58
have to create the subtotal. That
19:59
variable you have to put it here.
20:01
Total total mean this is a total
20:03
variable we have calculate the price and
20:05
quantity each time you have calculated
20:07
it is storing here okay the storing we
20:11
are passing to here the first time you
20:13
are going to add first product click add
20:15
button it's added first time again we
20:17
are putting this sign plus equal it is
20:21
calculate one by one first product
20:22
calculated uh price it will be storing
20:25
this variable first time second time you
20:27
calculate second I'm storing here after
20:29
That finally we have to finally you can
20:32
get the sub total and so into the final
20:34
total over here like this.
20:39
Here again sorry
20:42
here
20:44
it totals add and show the sub total
20:47
that's how we are working for this
20:51
one plus equal after that it's it is
20:54
showing to the subtotal text field this
20:57
text subtotal text field
21:00
go element ID this one you have to call
21:02
it here after clear after add all the
21:06
things you have to clear this ID first
21:08
name quantity prices all things after
21:10
added the values we have to clear this
21:11
all clear we clear like this
21:16
that's
21:19
simple
21:22
after that we have to work with the
21:24
calculate balance calculate balance mean
21:27
yeah this this function what happen
21:30
once you this one once the balance you
21:33
have to pay like this you have to have
21:35
to pay
21:38
now The balance should be 8. So how did
21:40
the processes work? This is on input
21:43
mean once you input that this function
21:45
should be work on here. It's coming
21:46
here. Uh what is the payment you what is
21:49
the payment there? What is the balance?
21:51
What is the payment is? What is the
21:52
payment you enter? It's coming here.
21:53
It's a subtotal. It's minus by payment
21:55
minus by subtotal. After that it is
21:58
assigned to the balance. So the balance
22:00
should be showing here.
22:03
Okay. After that if the balance is less
22:07
than zero
22:10
it will be showed the red.
22:13
Okay. Otherwise it is less than zero
22:16
means the balance is less than zero mean
22:20
if it is a if it is the balance is you
22:23
can write it like this. It's less than
22:25
this less than this payment is less than
22:28
subtotal. So that it show like this. So
22:31
it's it's show as a uh 23 27 okay
22:36
likewise it's calculated.
22:38
I hope you guys understood things well.
22:40
If you have any doubt you can leave me.
22:42
Thank you for watching. This is all the
22:43
source code you can uh download by my
22:46
website. Thanks for watching.