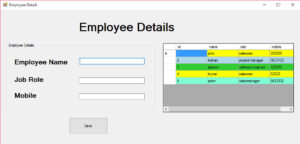
This tutorial will teach you c#.net employee registration form with datagridview validation. Employee registration form consist of different roles like sales man,sales manager,software enginner,project manager etc. the datagridview row color will be changed based on the role of the employee.this type of example is very easy find the roles for the efficient way.

import the Sql namespace
using System.Data.SqlClient;
Establish the Database Connection
SqlConnection con = new SqlConnection("Data Source=.; Initial Catalog=mdcompany; User Id=sa; Password=123");
SqlCommand cmd;
DataTable dt;
SqlDataReader read;
string sql;
Paste the code the inside the Save Button
string name = txtName.Text;
string mobile = txtMobile.Text;
string role = txtRole.Text;

string sql;

sql = "insert into contact(name,role,mobile) values(@name,@role,@mobile)";
con.Open();
cmd = new SqlCommand(sql, con);
cmd.Parameters.AddWithValue("@name", name);
cmd.Parameters.AddWithValue("@role", role);
cmd.Parameters.AddWithValue("@mobile", mobile);

cmd.ExecuteNonQuery();
MessageBox.Show("Record Addddedddd");

txtName.Clear();
txtMobile.Clear();
txtRole.Clear();
txtName.Focus();
When you view the records we have did the validation on the datagrid view. the datagridview row color will be changed based on the role of the employee.
Create the function GetDataFromDB()
private DataTable GetDataFromDB()
                {

                    SqlDataAdapter ada1 = new SqlDataAdapter("select * from contact", con);
                    DataTable dt = new DataTable();
                    ada1.Fill(dt);
                    dataGridView1.DataSource = dt;

                    return dt;
                }


            private void ColorRow(DataGridViewRow row)
            {
                if (row.Cells["role"].Value != null)
                {
                    switch (row.Cells["role"].Value.ToString())
                    {
                        case "salesman":
                            row.DefaultCellStyle.BackColor = Color.Yellow;
                            return;
                        case "software engineer":
                            row.DefaultCellStyle.BackColor = Color.LimeGreen;
                            return;
                        case "project manager":
                            row.DefaultCellStyle.BackColor = Color.LightBlue;
                            return;
                        case "salesmanager":
                            row.DefaultCellStyle.BackColor = Color.Aquamarine;
                            return;
                    }
                }
                row.DefaultCellStyle.BackColor = Color.White;
            }
            private void ColorAllRows()
            {
                foreach (DataGridViewRow row in dataGridView1.Rows)
                {
                    ColorRow(row);
                }
            }
Select the datagridview and change the event of dataGridView1_CellValueChanged
  private void dataGridView1_CellValueChanged(object sender, DataGridViewCellEventArgs e)
            {
                if (dataGridView1.Columns[e.ColumnIndex].Name == "role")
                {
                    ColorRow(dataGridView1.Rows[e.RowIndex]);
                }
            }
In order to load the datagridview when the form is loaded
  private void Form1_Load(object sender, EventArgs e)
            {
                dt = GetDataFromDB();
                dataGridView1.DataSource = dt;
                ColorAllRows();
            }
after that we have call the dataGridView1_CellValueChanged event in to the constructor of the class
  public Form1()
        {
            InitializeComponent();
            dataGridView1.CellValueChanged += new DataGridViewCellEventHandler(dataGridView1_CellValueChanged);
        }
i have attached the video link below. which will do this tutorials step by step.